| When I first joined the Raspberry Pi Foundation, over a year ago now, one of my first assignments was to build a weather station around the Raspberry Pi. Thanks to our friends at Oracle (the large US database company), the Foundation received a grant not only to design and build a Raspberry Pi weather station for schools, but also to put together a whole education programme to go with it. Oracle were keen to support a programme where kids get the opportunity to partake in cross-curricular computing and science projects that cover everything from embedded IoT, through networking protocols and databases, to big data. The goals of the project was ambitious. Between us we wanted to create a weather experiment where schools could gather and access weather data from over 1000 weather stations from around the globe. To quote the original project proposal, students participating in the program will get the opportunity to:
After a year of grafting on hardware prototypes and software development I'm pleased to announce that the final PCB design has been committed to manufacture and we are ready to start pre-registering schools who'd be interested in participating in the programme. We have 1000 weather station kits to give away for free so to find out how your school can be part of this read the rest of this post below, but first some background on the project. If you’ve been on Twitter a lot you’ll have noticed me teasing this since about March last year. Below is a photo of the very first version.
I did a lot of testing to ensure that the components were reliable and wouldn’t become problematic on the software side after a long period of uptime. The goal was to have the Pi controlling everything, so that we could leverage learning opportunity: helping kids to learn about writing code to interface directly with the sensors, as well as displaying and analysing collected data. I settled on the following set of sensor measurements for the weather station:
This seemed like a good enough spread of data. I’m sure some people will ask why not this measurement or why not that. It was important for us to keep the cost of the kit under control; although there is nothing to stop you from augmenting it further yourself. Once that was nailed down I wrote a few lessons plans, and Lance and I trialled them with with two schools in Kent (Bonus Pastor Catholic College and Langley Park School for Boys). BBC Schools Report were on site and recorded a short feature about the day here. We gave the kids one lesson from the scheme of work, showing them how to interface with the anemometer (wind speed sensor) in code. One thing that was clearly apparent was how engaged they were. Once their code was up and running, and was able to measure wind speed correctly, they had a lot of fun seeing who could get the fastest movement out of the sensor by blowing on it (current record is 32 kph, held by Clive “Lungs” Beale). Warning: there is a fainting risk if you let your kids do this too much! We went away from this feeling we were very much on the right track, so we continued to design the scheme of work. I’m also very glad to report that we’re not doing this all on our own! We’ve partnered with the Met Office and OCR Geography to produce the learning resources that will cover understanding how weather systems work and interpreting patterns in the data. The scheme is has been broken down into three main phases of learning resources:
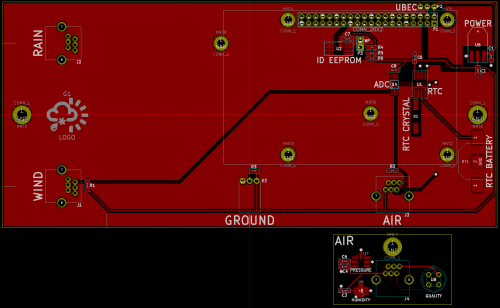
My next task was to take the breadboard prototype and create a PCB test version that we could use in a small trial of 20 or so units. I had not done any PCB design before this. So over the course of a couple of days I learnt how to use a free, open source, PCB design tool called KiCAD. I used a brilliant series of YouTube videos called Getting To Blinky by Contextual Electronics to get to grips with it. Below is my second attempt. This board is what most hardware designers would call a sombrero. The Pi goes in upside down so it’s like a HAT that’s too big! I was aware that it was a huge waste of PCB real-estate. However, for the small volume run we were making, it was a convenient way to mount the board inside a cheap IP65 junction box that I wanted to use as the case. Below is the PCB prototype when first assembled. The little silk screen rain cloud graphic was borrowed from BBC Weather (thanks guys).
You’ll notice there are two boards. The small board marked AIR holds the pressure, humidity and air quality sensors. Since these must be exposed to the air they are at risk of atmospheric corrosion, especially in coastal environments. I wanted to avoid this risk to the Pi and the main board so this is why I split those sensors off to a separate smaller board. Below is how they look inside their respective cases.
The Pi sits inside the water-tight box on the left with M20 grommets to seal the cables going in and out. The AIR board on the right has conformal coating (a spray on protective layer), and is connected to the main board by a short length of cable. There are three large holes on the base of its case to allow the air in. The weather station also needs a reliable network connection for remote monitoring, further code changes, to allow it to upload to Oracle, and to make sure that other computers on your school network can load its web pages. Most importantly it also needs power. So instead of considering large batteries or solar panels I decided to kill two birds with one stone and use power over Ethernet. This allows power and network connectivity to be supplied through a single cable, reducing the number of cable grommets needed. You might be thinking that WiFi is an option for this; however, school WiFi networks are notoriously overloaded with many mobile devices competing for service. So, if you go the same way as me, your school will need a long cable to run from the school building out to the location that you choose for the weather station. This basically means you never have to worry about its power or network connectivity. You are welcome to solve these challenges in your own way though, and this can actually be a very engaging and fun activity for the students to do themselves. Once I had the PCB prototype working I had to get twenty more made and tested. This involved spending hours (it seemed longer) on the Farnell website building up a massive basket of electronic components. When the new boards and components were in my possession we took them down to a local company, EFS Manufacturing, in Cambridge for assembly. Here are the twenty assembled and tested boards:
And here is another layer of the conformal coating spray going onto the AIR boards in the Pi Towers car park. It was a bit smelly and I didn’t want to gas out the office!
You’ll notice there are small bits of sticky tape on there. This is because the conformal coating needs to protect the solder joints on the board, but not block up the air holes on the sensors. This was a bit of a delicate job involving cutting the tape into tiny shapes, waiting for the coating to dry, and peeling it off using a scalpel. So then it was just a matter of assembling the 20 kits with everything required to build a weather station. From the power bricks, rain gauges and wind vanes right down to grommets, screws and rubber washers. The trial participants were chosen by us to give us a coverage of field-trial users, schools and promotional partners. We kept one back to put on the roof of Pi Towers, and the rest were shipped at the end of November last year.
Slowly but surely reports have been coming in about these prototype kits being used in schools and code clubs. Dan Aldred of Thirsk School & Sixth Form College has introduced Weather Wednesdays.
Matthew Manning, who runs the awesome YouTube channel RaspberryPiIVBeginners, made this video about setting his one up: Andrew Mulholland, of Raspi-LTSP fame, has been using one at a Raspberry Jam where he volunteers in Northern Ireland.
James Robinson’s year 10 pupils from Soham Village College have been working through the scheme of work too.
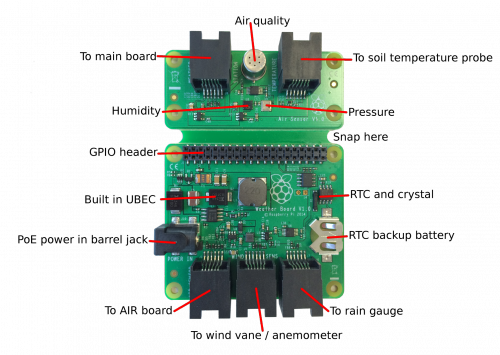
OCR are putting one on their roof, and we’re still trying to acquire permission from the building owners at Pi Towers so we can put ours up on the roof. (Right now it’s operating from an outside window ledge.) Meanwhile, now that I was confident about it, I handed over the electrical schematic of the prototype to our engineering team. They imported it into the professional CAD package that the Raspberry Pi was designed in, and proceeded to make the Weather Board into an official HAT. They have gone through it and essentially reworked everything to the same standard that you would expect from our products. So here it is, feast your eyes. You snap off the one side, and that is the equivalent of the small AIR board on the prototype. If you join our weather station scheme, this is what you will get, along with all the wind vanes, screws and other bits you’ll need. The plan is to mount the HAT onto the Pi using standard 11 mm stand-offs. Those will then mount onto a perspex sheet, and that sheet will screw into the electrical junction box. Nice and cheap. The Raspberry Pi Weather Station kit is a great way to get your pupils involved in a wide range of computing activities whilst undertaking a practical science experiment. There is lots of opportunity for cross-curricular discussion on the science of meteorology, geography and global climate change. You will also get to participate in a global programme with other schools around the world. We have 1000 weather station units to give away to schools that sign up. The supporting educational resources are written in the English language and targeted at students aged around 15-16 years old; however we’re anticipating participation from pupils both younger and older than this. If your school would like to be one of this thousand then please sign up on THIS PAGE. People we would like to thank:
In case you missed it above, here’s the School Sign Up again. |
A Semi-automated Technology Roundup Provided by Linebaugh Public Library IT Staff | techblog.linebaugh.org
Tuesday, February 10, 2015
Raspberry Pi Weather Station for schools
Subscribe to:
Post Comments (Atom)


No comments:
Post a Comment