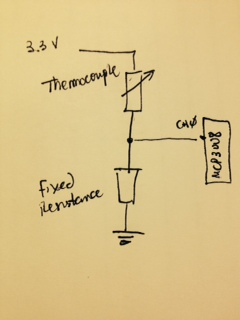
| Here’s another guest post from Allison Taylor at Wolfram Research. We’ve seen sous vide applications before – but we’ve never seen one that uses the Wolfram Language and Mathematica to describe elegant curves while it prepares your dinner. Thanks Allison, and thanks to Diego Zviovich, who came up with this project. Diego Zviovich, another one of our ambitious power-users of Mathematica and the Wolfram Language on the Raspberry Pi, has managed to (affordably) master the science of sous-vide cooking! For those who aren’t familiar, sous vide is a modern cooking practice where the food is first put into airtight bags and then cooked in a water bath at a very precise temperature. The result is perfect, evenly cooked meat or fish, with much greater penetration of flavours from any marinade you might be using. Actual sous-vide cookers cost hundreds (or thousands) of dollars to buy, but with a few sensors, a crock pot, and your Raspberry Pi with Mathematica installed, you can create your very own sous vide at a fraction of the price! What you'll need (along with your Raspberry Pi + Wolfram): The 5V 2-relay control module will be used to control the power to the crock pot. We'll be automating this switch to turn on and off depending on our thermocouple readings, maintaining the appropriate constant temperature that we want. A walk-through for setting up a circuit and connecting the relay from your crock pot to your RPiPi can be found in this handy YouTube tutorial. Once set up, turning the crock pot on and off with the Wolfram Language is very straightforward. To turn it on: DeviceWrite["GPIO",17->1] And to turn it off: DeviceWrite["GPIO",17->0] In order to get the temperature readings using thermocouples, we'll need to set up an analog-to-digital converter—since the GPIO on the RPi does not have analog pins. A wiring diagram for the MCP3008 can be found here. We'll only be using two of the eight analog sensors for our two thermocouples (one for the water bath and one for the food probe). They must be connected to the CH0 and CH1 inputs of the MCP3008 in the following way:
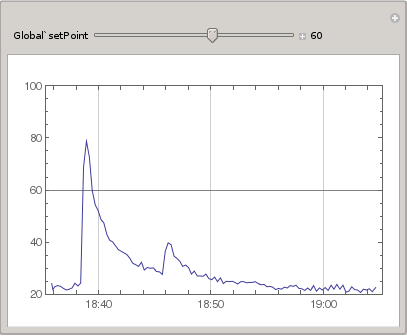
Once you've decided at what temperature you want to cook your food, you can conduct a simple experiment to determine the ideal fixed resistance value that you will need to effectively maintain it. Using your thermocouples, a regular thermometer, a voltmeter, and three glasses of water—one iced, one warm, and one hot—take three temperature measurements and three resistance measurements (one from each glass of water) and fit the data to a curve using Mathematica. Using Diego's data as an example: temp = {20.6, 42, 83.3} + 273.15 resistance = {220650., 95800., 26340.} data = Transpose[{Log@resistance, Log@temp}] lm = LinearModelFit[data, x, x] lm[{"RSquared"}] The model above fits very well (R^2=.998), so we can use the curve to find the expected resistance at our desired temperature. For this example, let's say 60 degrees Celsius. invdata = Transpose[{Log@temp, Log@resistance}] Fit[invdata, {1, x}, x] (*74.3895 - 10.9297 x*) f[x_] := 74.38949510675315` - 10.929736543045369` x Exp[f[Log[60 + 273.15]]] (*54344.9*) From these results, using a 56K resistor for the thermocouples will provide the appropriate temperature range we need. To read the temperature values from the thermocouples, we will need to probe the analog inputs from the MCP3008 through the GPIO. We will develop a function to do this, using two libraries — update-rc.d -f gpio defaults after the installation. With these libraries installed, we can now build a function to get the temperature values using MathLink. The two files will be as follows: adc.tm :Begin: adc :Pattern: adc[adc_Integer, clock_Integer, in_Integer, out_Integer, cs_Integer] :Arguments: {adc, clock, in, out, cs} :ArgumentTypes: {Integer, Integer, Integer, Integer, Integer} :ReturnType: Integer :End: adc.c #include #include int adc(int adc, int clock, int in, int out, int cs) { return mcp3008_value(adc, clock, in, out, cs); } int main(int argc, char *argv[]) { return MLMain(argc, argv); } Compile the files by running mcc adc.tm adc.c –o adc And now we can open up the Wolfram Engine or Mathematica and build the sous-vide program! Install["/home/pi/mathematica/adc/adc"]; (*We can now call function adc to read the voltage drop at the thermocouple The voltage reading will be read by the MCP as a value between 0 (0V)to 1023 (3.3V) *) (* Analog Channel = 0, ClockPin = 18, In = 23, Out =24, CS = 25 *) adc[0, 18, 23, 24, 25] (*The following function translates the voltage reading to temperature in Celsius*) temp[channel_] := Module[{R2 = 56000, a = -0.0913946, b = 6.80504, R1, x = adc[channel, 18, 23, 24, 25]}, R1 = (1024 - x) R2/x ; Exp[a Log[R1] + b] - 273.15] (*Function datapoints is used to collect temperature readings in a matrix of length maxPoints. It also controls the relay to turn on the crock pot when the temperature reading is below the setpoint and turn it on when above the set point*) datapoints[myList_List, fn_, maxLength_Integer, setPoint_Integer] := Module[{x, val = fn}, x = Append[myList, {DateList[], fn}]; If[val < setPoint, DeviceWrite["GPIO", 17 -> 0], DeviceWrite["GPIO", 17 -> 1]]; If[Length[x] > maxLength, x = Take[x, -maxLength], x]] data={}; (*Using a Chart to establish the setpoint and graph the temperature trend *) Manipulate[ DateListPlot[Refresh[data = datapoints[data, temp[0], 300, setPoint], UpdateInterval -> 15, TrackedSymbols -> {}], Joined -> True, PlotRange -> {Automatic, {20, 100}}, GridLines -> {Automatic, {setPoint}}], {{setPoint, 60}, 30, 80, 1, Appearance -> "Labeled"}]
Check out Diego giving a demo of the program and relay controller! Also, if thermocouples aren't your thing, you can alternatively get your temperature readings using a waterproof digital temperature sensor and following this lovely setup tutorial by Adafruit. Happy cooking! |
Wednesday, April 30, 2014
Sous-vide cooking with the Wolfram Language
Subscribe to:
Post Comments (Atom)
No comments:
Post a Comment